
Custom Mechanical Keyboards Parts
A good place to start before building anything is to know what parts make up your build, and to find out whether said parts are compatible with: one, your needs, and two, other parts. Custom mechanical keyboards parts include PCB, case, mounting plate, switches, stabilizers, keycaps, sound dampeners, cabling.
Printed Circuit Board/PCB
Simply put, a printed circuit board is a non-conductive board with circuitry (traces, most often made of copper) and components that are etched or soldered onto it. The components determine what basic and additional features the PCB will offer. Some PCBs also have designs or useful legends silkscreened on to them.
- Standard PCB: A PCB equipped with a microcontroller, a diode for every switch, and a mini-USB or USB-C connector.
- RGB PCB: A PCB also equipped with LEDs by every switch socket and an LED driver chip to light up the scene. Some RGB PCBs also support neat sound-controlled/coordinated RGB.
- Hot-Swappable PCB: A PCB also equipped with hotswap sockets that allows switches to be installed and removed from the board without any soldering or desoldering.
The PCB in context to a keyboard has two roles:
- Holding the components in place
- Connecting them together, through its traces.
The guide does a great job at showing where to place components and how to run the traces - a PCB’s wires - to these components.
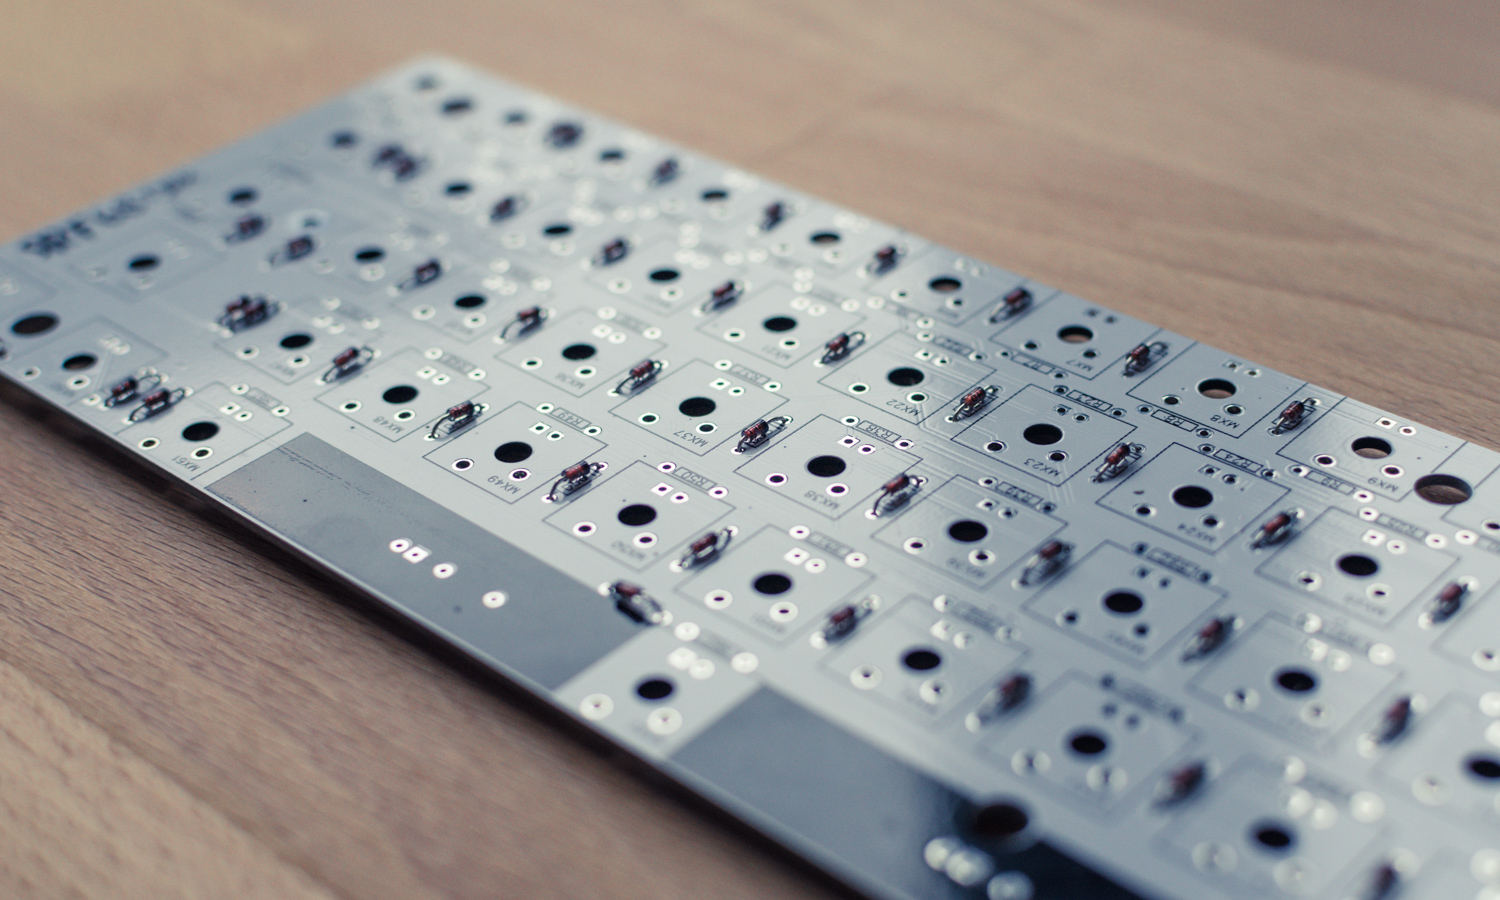
1. Doubts and planned changes

After following the tutorial I had a board as seen above, but I felt like I was missing some knowledge and portions of a final design.
What I specifically lacked in knowledge was how to put a bootloader/firmware on the MCU and what lacked in the design was a way to use screws to fasten this board to a case.
The screw holes were easy. I just added them around the corners and next to the switches.
One thing I did not do was connect these screw holes to ground. In short, ground is the place ‘excess’ power (such as from ESD) can go, instead of going through the components.
This is something I also should've done with the four through-hole legs of the USB connector, so the shield of the USB connector was grounded too.
The bootloader/firmware issue was another thing, as to install firmware to an ATmega32u4, you need a bootloader (kind of like a BIOS for an MCU).
I wasn’t sure if that came pre-loaded on it or not. Some people on Reddit told me it did come with a bootloader, but with the power of hindsight I can tell you it doesn’t (from the vendor I bought it from).
You can get a programmer that holds the MCU itself, but I chose to include an ICSP header on the PCB, which allows you to connect another device (like an Arduino UNO) to it, to burn the bootloader on the MCU.
Once you have a bootloader, you can simply use USB to flash a firmware on it.
More on this in section.
2.Small Alterations and Additions
The tutorial had set up the PCB a certain way, but through adding these screw holes and ICSP header, I had to do some alterations to make everything fit.
At some point - for aesthetics - I decided I wanted the components on the front side of the board too, instead of the back, so I edited the majority of the board at this point, by moving the components to the desired locations and running the needed traces.
Of course I am glossing over details here, but once you get the hang of it, routing PCB traces in KiCAD is a lot of fun!
Once the components were in the right places, with all the traces connected, I had a PCB ready for production!
Of course no PCB is complete without a silly logo and some text on the board: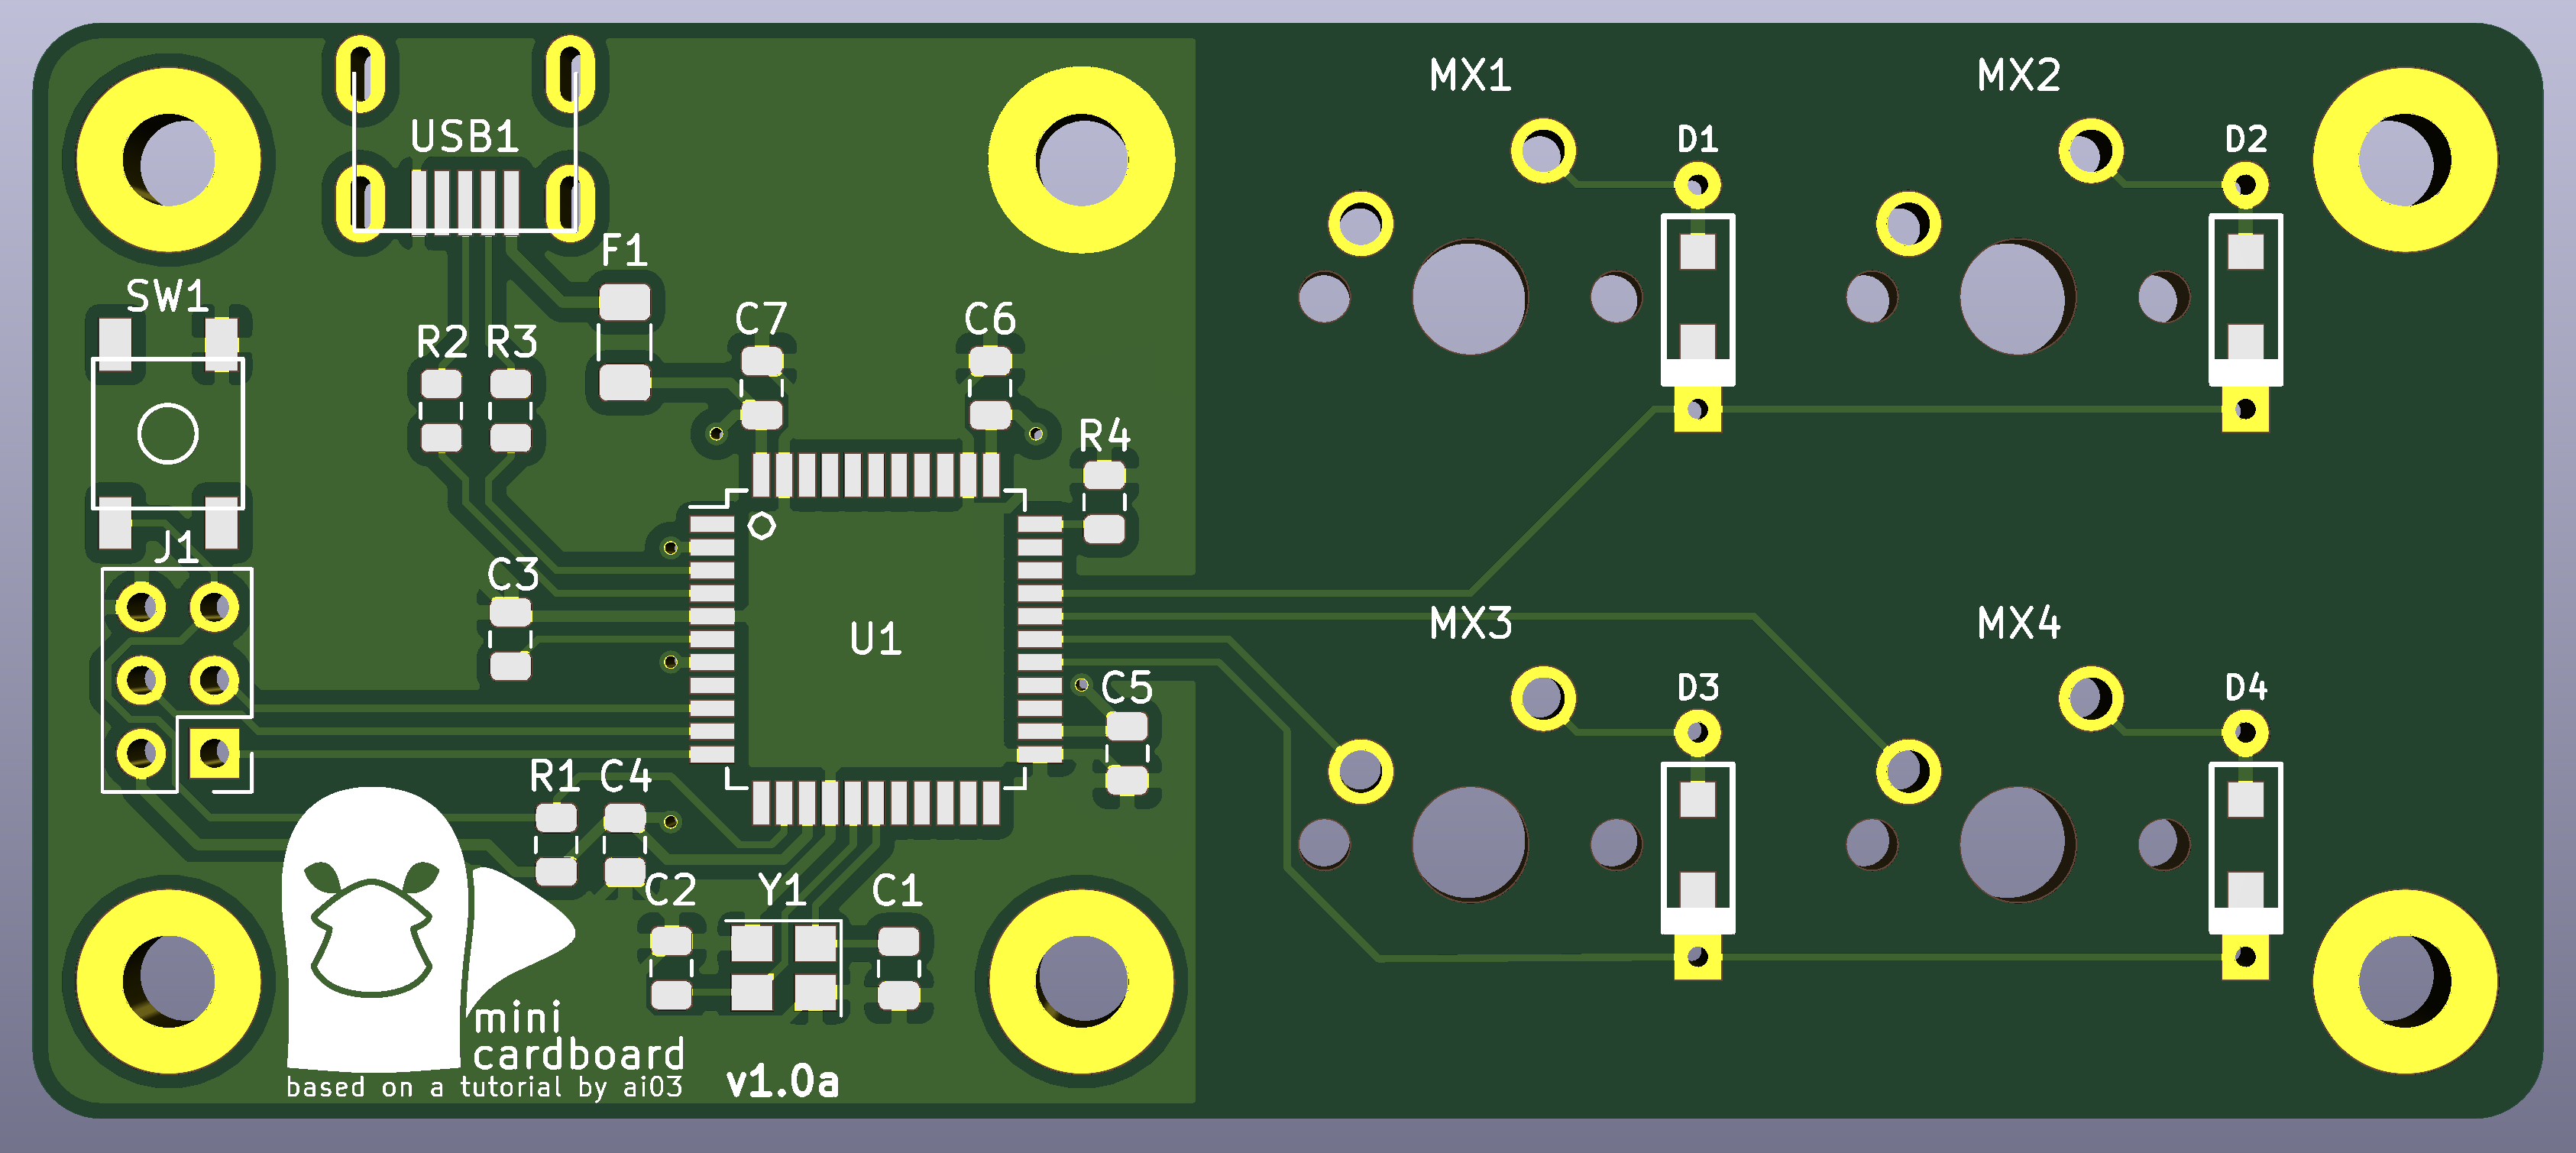
Case
A case offers some basic physical shock- and water-resistance for the board’s delicate internals, and also adds some flair to your build. Every case should come with mounting holes that align with the keyboard’s PCB.

- Acrylic: Solid material that’s easy to maintain. Semi-transparent variants can pair up with RGB PCBs for interesting lighting effects unattainable with wood or metal cases.
- Wood: Solid material with a very distinct aesthetic thanks to its wood grain. Durability and color retention as time passes might vary depending on the type of wood and finishing used.
- Anodized Aluminum: Solid, weighty, and durable. Often coated with a protective matte layer.
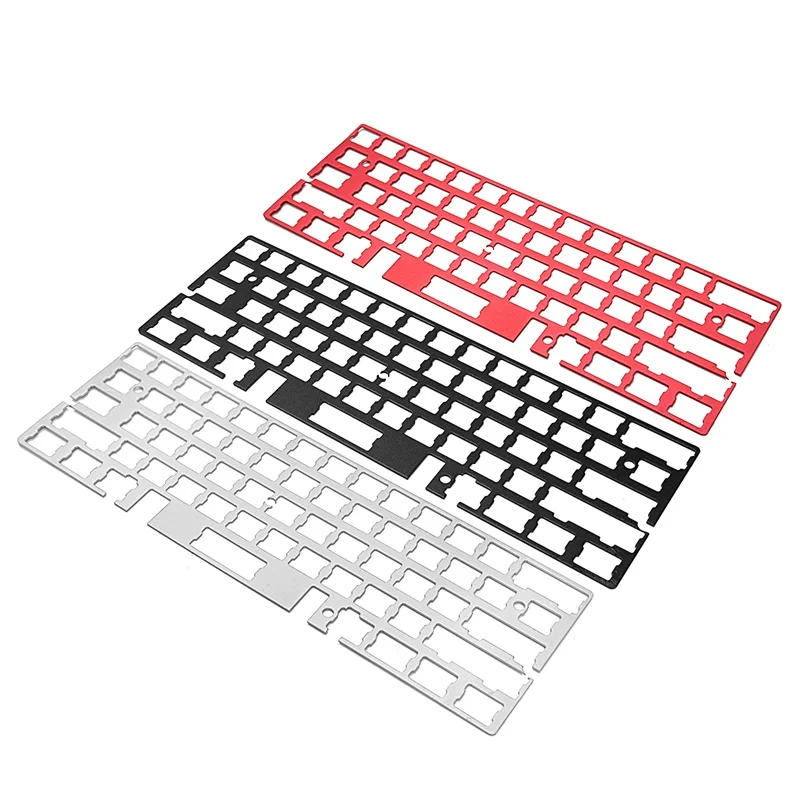
Mounting Plate
A mounting plate is a flat sheet of material -- commonly stainless steel or aluminum, but also plastics and carbon fiber -- that rests above the PCB and holds a keyboard’s switches in place. Different materials offer varying levels of flexing and affect the keyboard’s clack, or the sound produced when the switch bottoms out. The general rule of thumb is denser mediums create higher-pitched sounds.
Note: Mounting plates are often not essential for a keyboard with PCB-mounted switches, but can improve the switches’ stability and avoid misaligned switches (for the OCD-sensitive, like yours truly).
- Brass: Very stiff and dense material. Produces higher-pitched clacks.
- Stainless Steel: Very stiff and dense material. Produces higher-pitched clacks.
- Aluminum: Fairly stiff and dense material. Produces higher-pitched clacks.
- Carbon Fiber: Lightweight material. Produces higher-pitched clacks.
- Acrylic: Stiff material. Produces lower-pitched clacks.
- Polycarbonate: Stiff material. Produces lower-pitched clacks.
- ABS: Softer material. Produces more muted clacks.
- FR4: Softer material. Produces more muted clacks.
- POM: Softer, flexible material. Produces more muted clacks.
- Plateless: No material. Produces slightly quieter, fainter clacks than plated counterparts.
Plates may be mounted in a number of different ways in a keyboard, to varying degrees of stability and convenience.
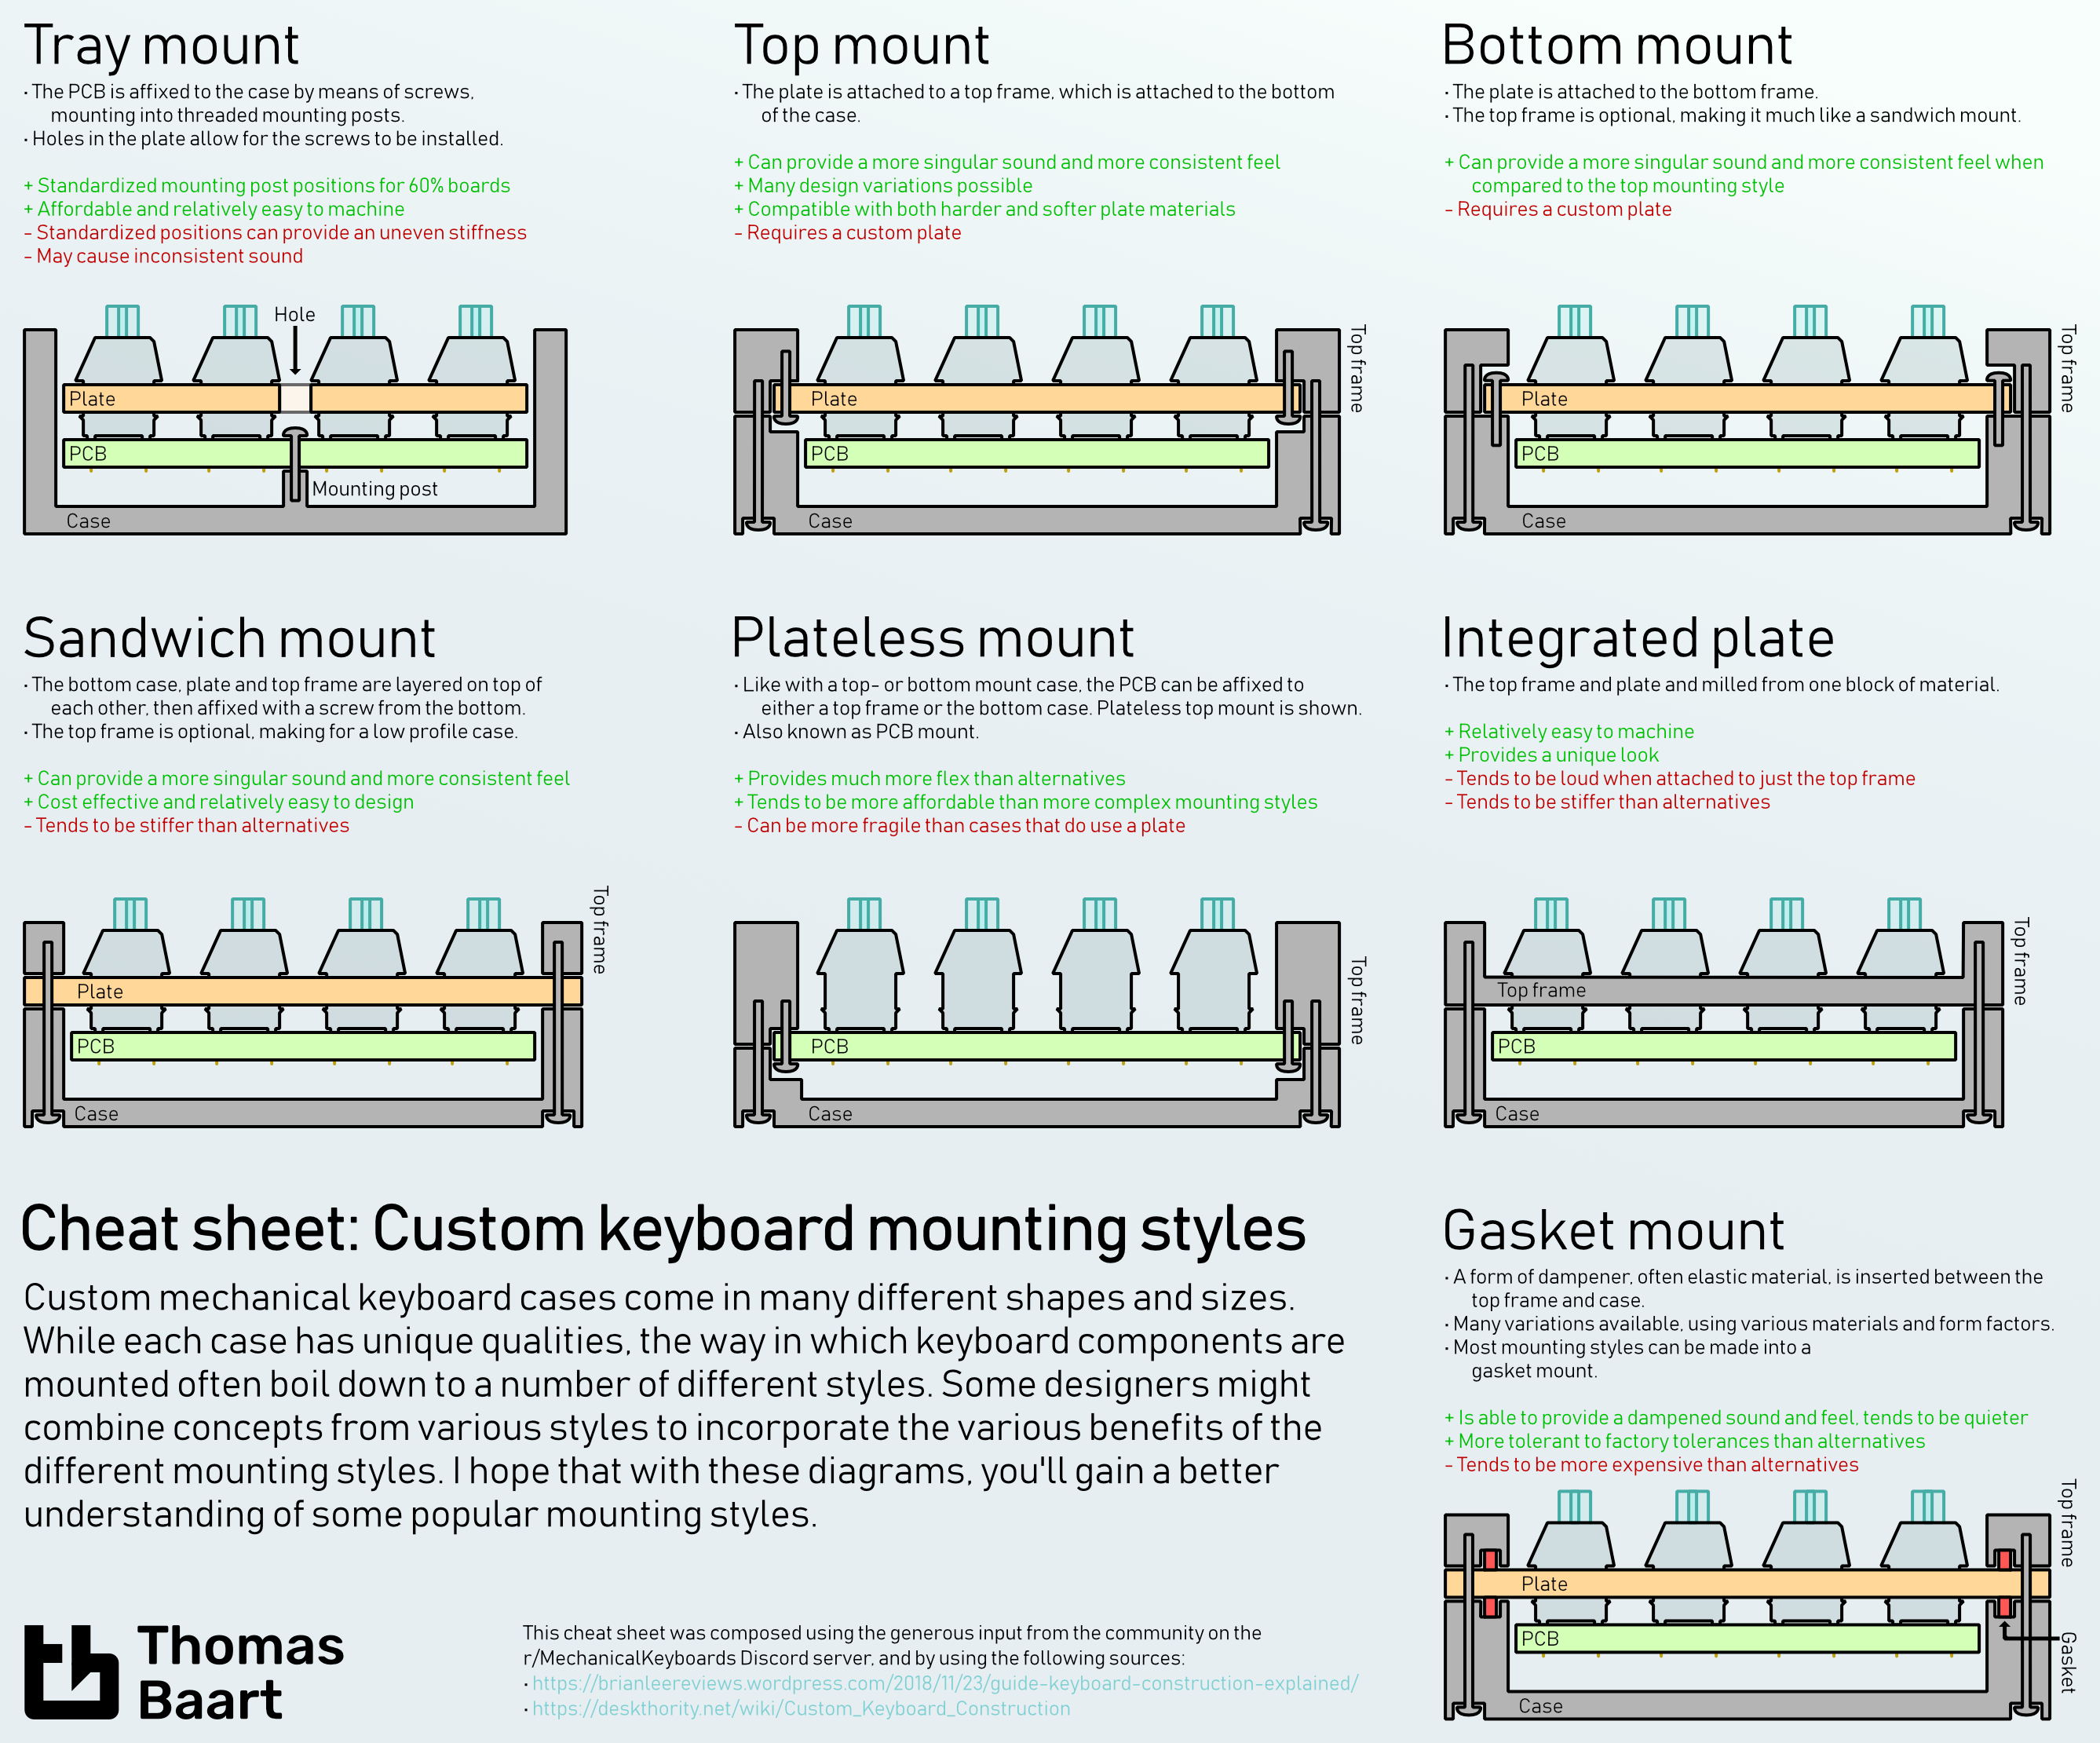
(Click to Enlarge.)
Source: Custom Keyboard Mounting Styles from Thomas Baart.
Switches
The mechanical switch is a contained unit responsible for the feel and clicks (or lack of clicks) of the keyboard. In terms of compatibility, switches can be divided into PCB-mounted switches and plate-mounted switches.
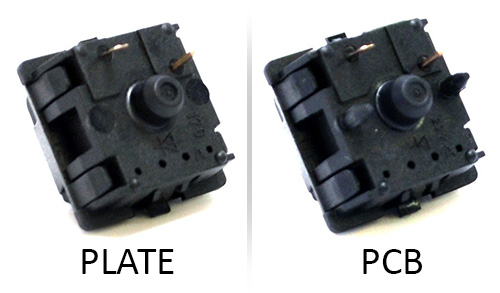
- Plate-Mounted Switches: Switches secured in place by a mounting plate, has only three pins. Usually offers more stability than PCB-mounted switches.
- PCB-Mounted Switches: Switches secured in place by the PCB, has at least five pins. Two of these pins are plastic-molded prongs, and for some switches, can be snipped off to irreversibly convert a PCB-mounted switch to a plate-mounted switch.
Note that keyboard parts compatible with one switch may not be compatible with other switches. For example, an MX-compatible PCB has a specific pin layout for MX-style switches, and will not accommodate Alps switches (exceptions exist, of course).
The world of switches is deep and vast, and deserves its own segment (Section 5.0).
Stabilizers
A wire stabilizer, outfitted on larger (2U+) keycaps, is a stiff wire designed to keep the entire keycap steady and level during a keypress. Often, the wire fits between two pegs that are connected to the keycap, but in Cherry MX “leveling mechanisms” (i.e. stabilizers™) the wire rests between two mini-switch-thingies that either clip into or are screwed directly into the PCB.

- Plate-Mounted Stabilizers: Stabilizers with housings that clip into the mounting plate. These are installed after the mounting plate has been attached to the PCB, and mounting plates must have specific cutouts to be compatible with plate-mounted stabilizers.
- PCB-Mounted Stabilizers: Stabilizers with housings that clip into the PCB. These are installed before the mounting plate is attached to the PCB, and PCBs must have specific holes cut out to be compatible with PCB-mounted stabilizers. Most mounting plates with rectangular stabilizer cutouts will be compatible with PCB-mounted stabilizers.
- Screw-In Stabilizers: Stabilizers with housings that screw into the PCB. These are installed before the mounting plate is attached to the PCB, and PCBs must have specific holes cut out to be compatible with screw-in stabilizers. Most mounting plates with rectangular stabilizer cutouts will be compatible with PCB-mounted stabilizers.
- Costar Stabilizers: Stabilizers with a wire that hooks into the keycap. Most commonly found on older keyboards.
Stabilizer sets usually come in sets of 4 × 2U stabilizers, plus either a 1 × 6.25U or 1 × 7U spacebar stabilizer, fit for compact and TKL layouts. Full-sized and 1800-compact keyboards will require 5 to 7 × 2U stabilizers, plus a 1 × 6.25U or 1 × 7U spacebar stabilizer. Some custom ortholinear and ergonomic keyboards use 1 to 4 × 2U stabilizers (e.g. Planck, Ergodox), while others do not use stabilizers entirely (e.g. Corne, Dactyl Manuform).
Keycaps
Keycaps are the covers that fit over a switch’s stem and that make physical contact with your fingers during a keypress. Different keycap selections can completely overhaul a keyboard’s aesthetics, thanks to the myriad of keycap materials, shapes, and designs that are available.
Note: Keycap mounts are not universally compatible with all types of switch stems. The most common mount is the MX-style mount (cross-shaped), but other types exist as well.

- ABS (Acrylonitrile Butadiene Styrene): Plastic with a smooth texture and slightly glossy look. Surface layer often rubs away with prolonged use, resulting in ‘ABS shine.’ Also, gradually discolors when exposed to sunlight/UV light -- discoloration is most noticeable on white keycaps.
- PBT (Polybutylene Terephthalate): Hard and durable plastic with a somewhat rough, grainy surface texture and a matte finish. Surface layer is more resistant to ‘shine,’ and does not discolor with light exposure.
- POM (Polyoxymethylene/Acetal): Hard, durable, and dense plastic with a semi-opaque, smooth finish. Surface layer is more resistant to ‘shine.’
- PC (Polycarbonate): Durable plastic with a smooth, transparent surface. Surface layer is more resistant to 'shine,' and does not discolor with light exposure.
- Resin: Viscous substance solidified into a rigid, plastic-like material with a smooth, glossy finish. Usually molded around unique, hand-sculpted miniatures to preserve the piece’s delicate details while maintaining keycap functionality -- think, museum display cases.
- SLA/Stereolithography Resin: Rigid plastic-like material with a smooth finish. Often used in 3D printing to create unique, highly-detailed, limited-run designs.
- Metal: Hard, durable, and very dense material with a smooth texture and shiny, reflective finish. Probably a smudge magnet, based on pure speculation. Whole keysets are difficult to find outside of Etsy commissions.
- Rubber: Soft, dense material with an opaque, textured (usually cross-hatched) surface. Appears to be a rubber sleeve fitted around a plastic shell?
Keycaps also come in a variety of profile shapes, and whether a keyboard is high-profile or low-profile depends partly on the height of its keycaps; the other deciding factor is switch type. Sculpted keycaps have a slight angle built into the keycap, while uniform keycaps are flat.

- Standard/OEM Profile: Sculpted keycaps with a level surface.
- Cherry Profile: Sculpted keycaps with a level surface and a slightly lower profile and shorter height compared to OEM profile keycaps.
- DCS Profile: Sculpted keycaps with a level surface, quite similar to Cherry profile keycaps.
- SA Profile: High-profile, sculpted keycaps with a slightly spherical indent in the middle of the keycap.
- KAT Profile: Sculpted keycaps with a slightly spherical indent in the middle of the keycap, has a slightly lower profile and shorter height compared to SA profile keycaps.
- MT3 Profile: High-profile, sculpted keycaps with a slightly spherical indent in the middle of the keycap, slightly different than SA profile keycaps.
- MG Profile: High-profile, sculpted keycaps with a very visible concave indent.
- MDA Profile: Sculpted keycaps with a gently curved surface.
- DSA Profile: Uniform keycaps with a slightly spherical indent in the middle of the keycap.
- XDA Profile: Uniform keycaps with a larger surface area compared to DSA profile keycaps.
Keycaps.info: For a more in-depth and slightly more quantitative comparison of keycap profile shapes and heights. Options to toggle between Cherry MX or Choc spacing, or to add and remove specific keycap profiles, are available.
Legends refer to the inscriptions or designs on a surface. The type of printing used for keycap legends affects its visual quality and durability. Most legends are printed on the surface of the keycap, but side-printed options are available as well. Some blank keycaps eschew legends entirely (hehe, Eschew).

- Pad Printed: Keycaps with legends inked directly onto its surface. Decent visual quality, but the ink wears away easily from frequent contact.
- Laser Etched: Keycaps with legends marked onto the surface with a laser. Decent visual quality with straight lines, but not with solid fill areas (e.g. arrowheads, Windows symbol). Laser etching may also fade away on keycaps susceptible to ‘shine.’
- Laser Printed: Keycaps with legends marked onto the surface with a laser and ink filled in the lasered grooves. Decent visual quality, but the ink can stain easily and the laser etching may fade away on keycaps susceptible to ‘shine.’
- Laser Engraved: Transparent keycaps that are coated in an opaque paint, with legends lasered off from the opaque surface coat to create transparent characters. Often used for backlit keycaps. Decent visual quality, but the surface coat may wear away from frequent contact, revealing the transparent keycap beneath.
- Dye Sublimation: Keycaps with legends permanently stained in the material, just beneath the surface. Decent visual quality for dark dyes on lighter surfaces, but ineffective for lighter-colored lettering on darker surfaces. Quite long-lasting, and resistant to ‘shine.’
- Double-Shot: Keycaps with legends molded from one piece of plastic, while the rest of the keycap is molded in another piece. Contrasting colors offer decent visuals, and because the legends are made of molded plastic rather than removeable ink, ‘shine’ isn’t an issue.
- Side-Printed: Keycaps with legends printed on one of its vertical sides, with the legends facing the user.
- Blank: Keycaps without any printed legends.
Keys may be illuminated in single or multiple colors if the keyboard’s PCB supports LED/RGB functionality. Some keycaps take advantage of LED/RGB lighting with backlit legends, LED windows, or translucency.

- Backlit/Shine-Through: Keycaps with transparent legends that can be illuminated by the LEDs underneath.
- Windowed: Keycaps with a small, transparent section that can be illuminated by the LEDs underneath.
- Pudding: Keycaps with an opaque top surface and semi-opaque walls that can be illuminated by the LEDs underneath. Resembles the two layers of a flan pudding, hence the name.
- Jelly: POM keycaps with a semi-opaque surface that can be illuminated by the LEDs underneath. Has a very soft and muted color when illuminated.
- Translucent: PC keycaps that are clear and sometimes tinted, revealing both the switch and the LEDs underneath.
Sound Dampeners
Sound dampeners are optional additions and fit around either the switch’s or keycap’s stem to soften the clack of the keyboard. Clacks are different from clicks; the former refers to the dull, muted sound produced when the switch bottoms out, whereas the latter refers to the sharp, high-pitched sound produced by a clicky switch.

-
O-Rings: Rubber rings that fit tightly around the keycap’s stem, reducing both the keystroke’s clack and travel distance. Mostly recommended for rounded keycap stems; mileages may vary with other switch stems.
- Diameter: Diameter is tied to stem compatibility. Recommended diameters are 5mm for MX-style keycaps and 7mm for Topre-style keycaps.
- Thickness: Thickness is tied to keystroke travel distance, with thicker rings greatly reducing travel distance. Thicknesses can range from 0.2mm up to 2.5mm.
- Hardness: Hardness, rated along a Shore A durometer scale, is tied to keystroke mushiness and clack softening. Lower hardness (30A - 40A) are softer in both feeling and sound, while higher hardness (70A - 80A) are firmer and less effective for sound-dampening.
- Soft-Landing Pads: Rubbery material with a circular cut-out that fits loosely around the switch’s stem, reducing the keystroke’s clack and cushioning the bottom out.
- Silencing Clips: Plastic casings that clip over the top of the switch, reducing the keystroke’s clack and cushioning the bottom out. Compatibility is mostly limited to MX-style switches and thinner keycaps.
Other ways to dampen keyboard noises, vibrations, and ping-y clacks exist, including but not limited to: gasket-mounted plates, sound-absorbing foam, soft rubber feet, etc.
Cabling
Most, if not all, wired custom mechanical keyboards use the USB 2.0 standard and HID subprotocol. USB 3.0 is quite rare on keyboards, and the max signaling rate increase from 480 Mbps to 5 Gbps usually has a very negligible observable impact.
Wireless customs also exist, but are far less common compared to wired ones.
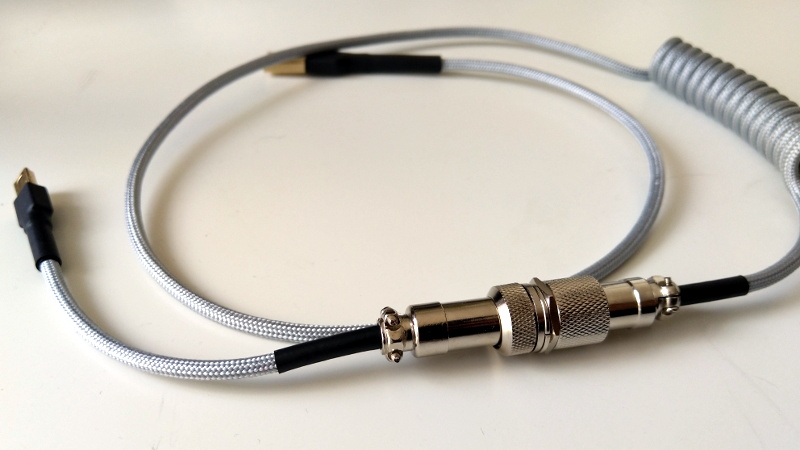
- Plain Cabling: Cables that use plastic cable jackets. Comes in straight and coiled variants, and the only differences seem to be aesthetics and total cable length.
- Paracorded Cabling: Cables with a layer of lightweight nylon wrapped over its cable jacket, often in a braided pattern, that lends it additional durability.
- Double-Sleeved Cabling: Cables with an additional layer of PET sleeving wrapped around its nylon cord and cable jacket, often in a braided pattern, that lends it additional durability and rigidity.


- USB Type-A Connector: One-way connectors.
- USB Type-C Connector: Reversible connectors.
- Micro-USB Connector: One-way connectors.
- Mini-USB Connector: One-way connectors.
- Aviator Connector (4-pin or 5-pin): Connectors fitted part-way on a cable for convenient attachment and detachment, and as a fashion statement.
- Wireless: Relies on Bluetooth/USB receivers, often operates at 2.4 GHz frequencies.
For those interested in custom cabling, cable vendors recommend keeping the total cable length below 9 ft (≈ 2.7 m) for keyboards with high power requirements, or below 13 ft (≈ 4 m) for all other keyboards. Longer cables may have issues delivering power to the board, and certain features (e.g. LED brightness, specific keys) may be diminished or disabled. Keyboards with high power requirements include: Drop CTRL, Drop ALT, Drop Shift, Ducky One 2 Mini, K-Type NOTE, and HHKB Keyboards.


